

How to use Canva’s Tracer to easily level up your designs
Canva gives you a few ways to turn images into vectors: the Vectorizer, the SVG converter, and the Tracer app. This guide focuses on the Tracer (also known as Vectorify), which lets you convert an image to a vector in Canva and get editable graphics you can resize, recolor, and reuse across your brand assets without losing quality.
VIDEO: Level Up Your Designs with Canva Tracer App
Why Tracer is worth adding to your workflow
The Tracer tool in Canva gives you a few practical advantages when you convert an image to a vector:
Vector graphics: Turning your images into vectors means you can resize them at any scale without losing quality, so your designs stay sharp on a business card or a billboard.
Color customization: Recolor a traced image to match your brand palette in seconds.
Creative flexibility: Use traced elements to build custom shapes, patterns, and illustrations that fit your brand assets.
Time-saving: The Tracer tool automates the vector creation you'd otherwise do by hand, which speeds up your whole process.
How to convert an image to vector in Canva using the Tracer tool: a step-by-step guide
Tracer vs. Vectorify vs. Vectorizer: which one do you actually need?
Canva names its vector tools in ways that trip people up, so here's the quick breakdown. The Tracer app and the Vectorify app are the same tool under different names, and it's the one this guide walks you through. It turns any image into a clean, editable vector you can recolor and resize. The built-in Vectorizer is a separate feature that works best on simple shapes and logos, and it lives right in your editor without adding an app.

Step 1: Upload Your Image
Select Your Image: Choose the image you want to trace. This could be a photo, a logo, or any other visual element.
Upload to Canva: Upload the image to your Canva workspace.

Step 2: Remove the Background
Background Removal: Use Canva’s built-in background removal tool to isolate the subject. Simply click on the “BG Remover” button and let Canva do the magic.
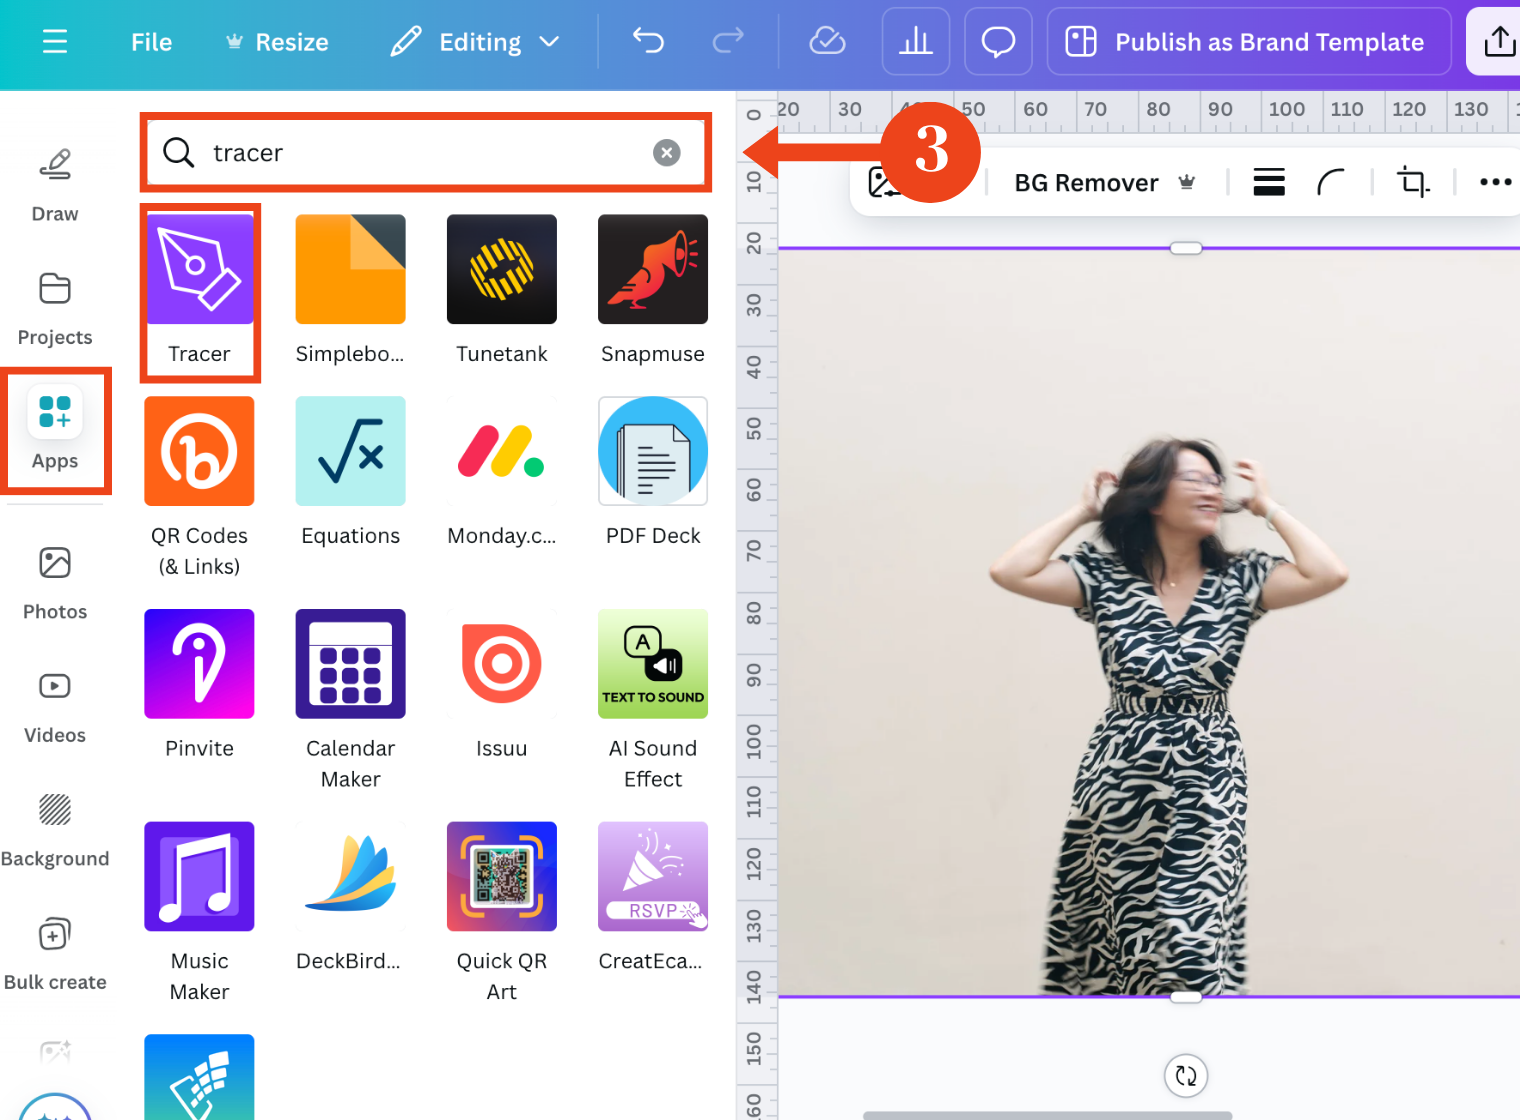
Step 3: Access the Tracer Tool
Navigate to Apps: Click on the “Apps” tab on the left-hand side of your Canva workspace.
Find the Tracer: Search for “Tracer” in the app search bar.

Step 4: Trace Your Image
Select Your Image: Choose the image you want to trace. You can either upload a new image or select the image you previously uploaded.
Start Tracing: Click on the “Trace Selected Image” button. Canva’s AI will analyze your image and create a vector outline.
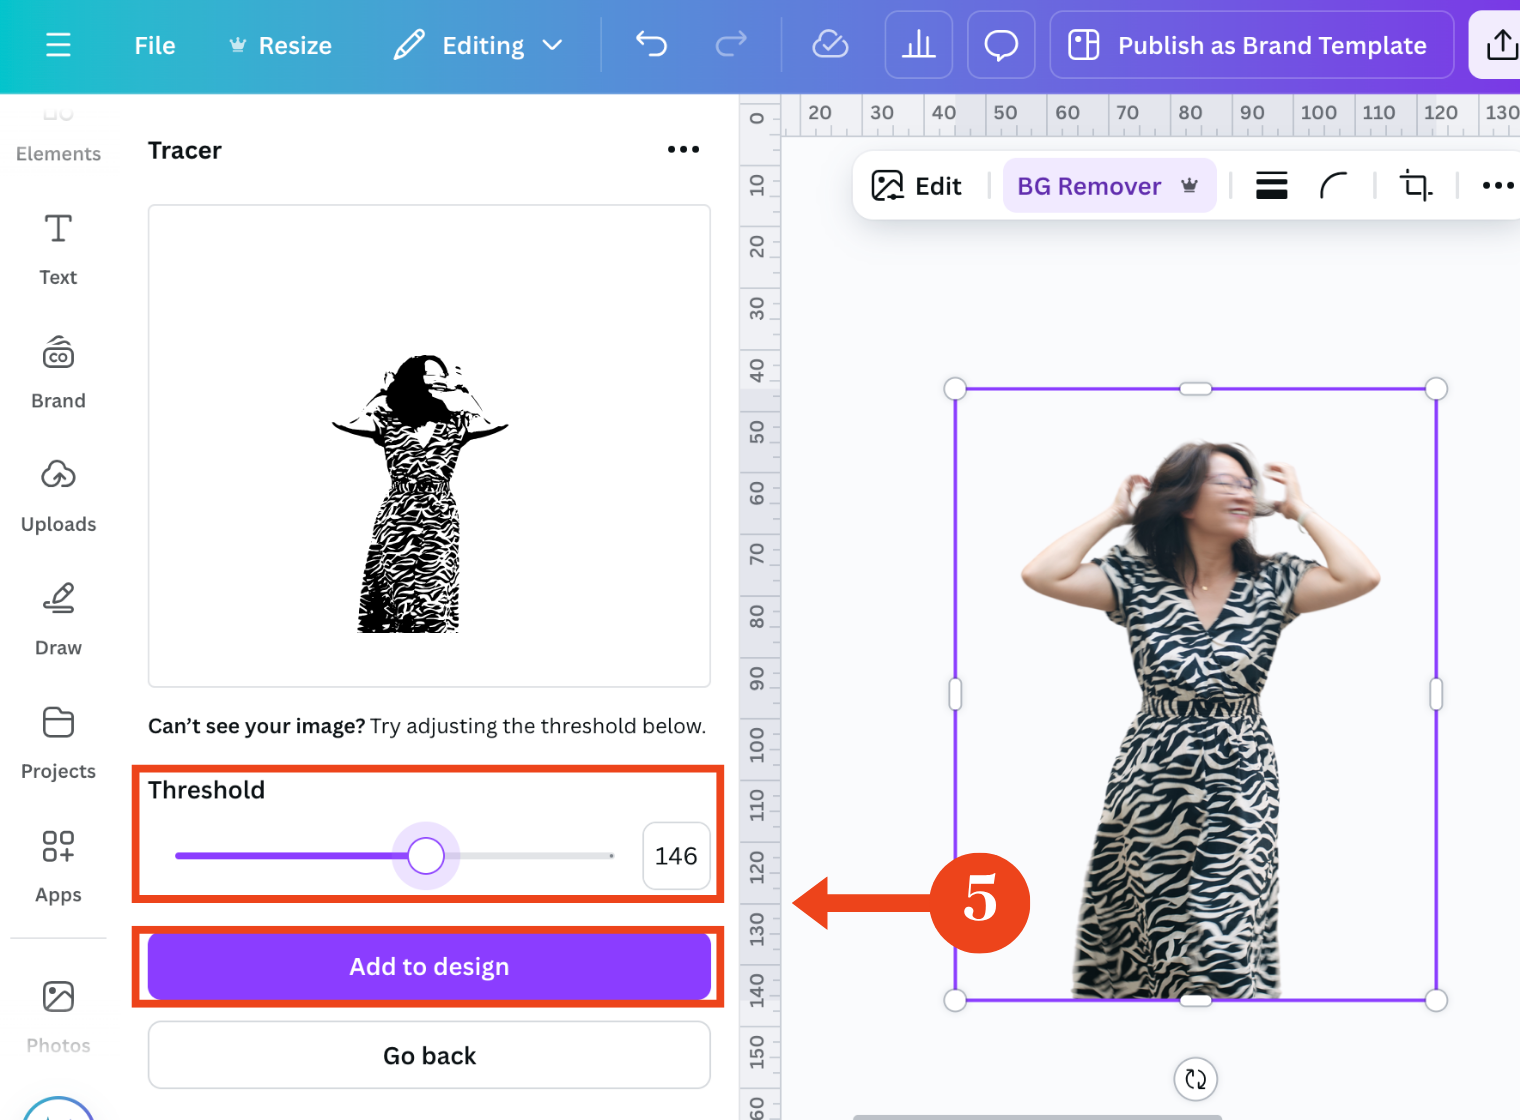
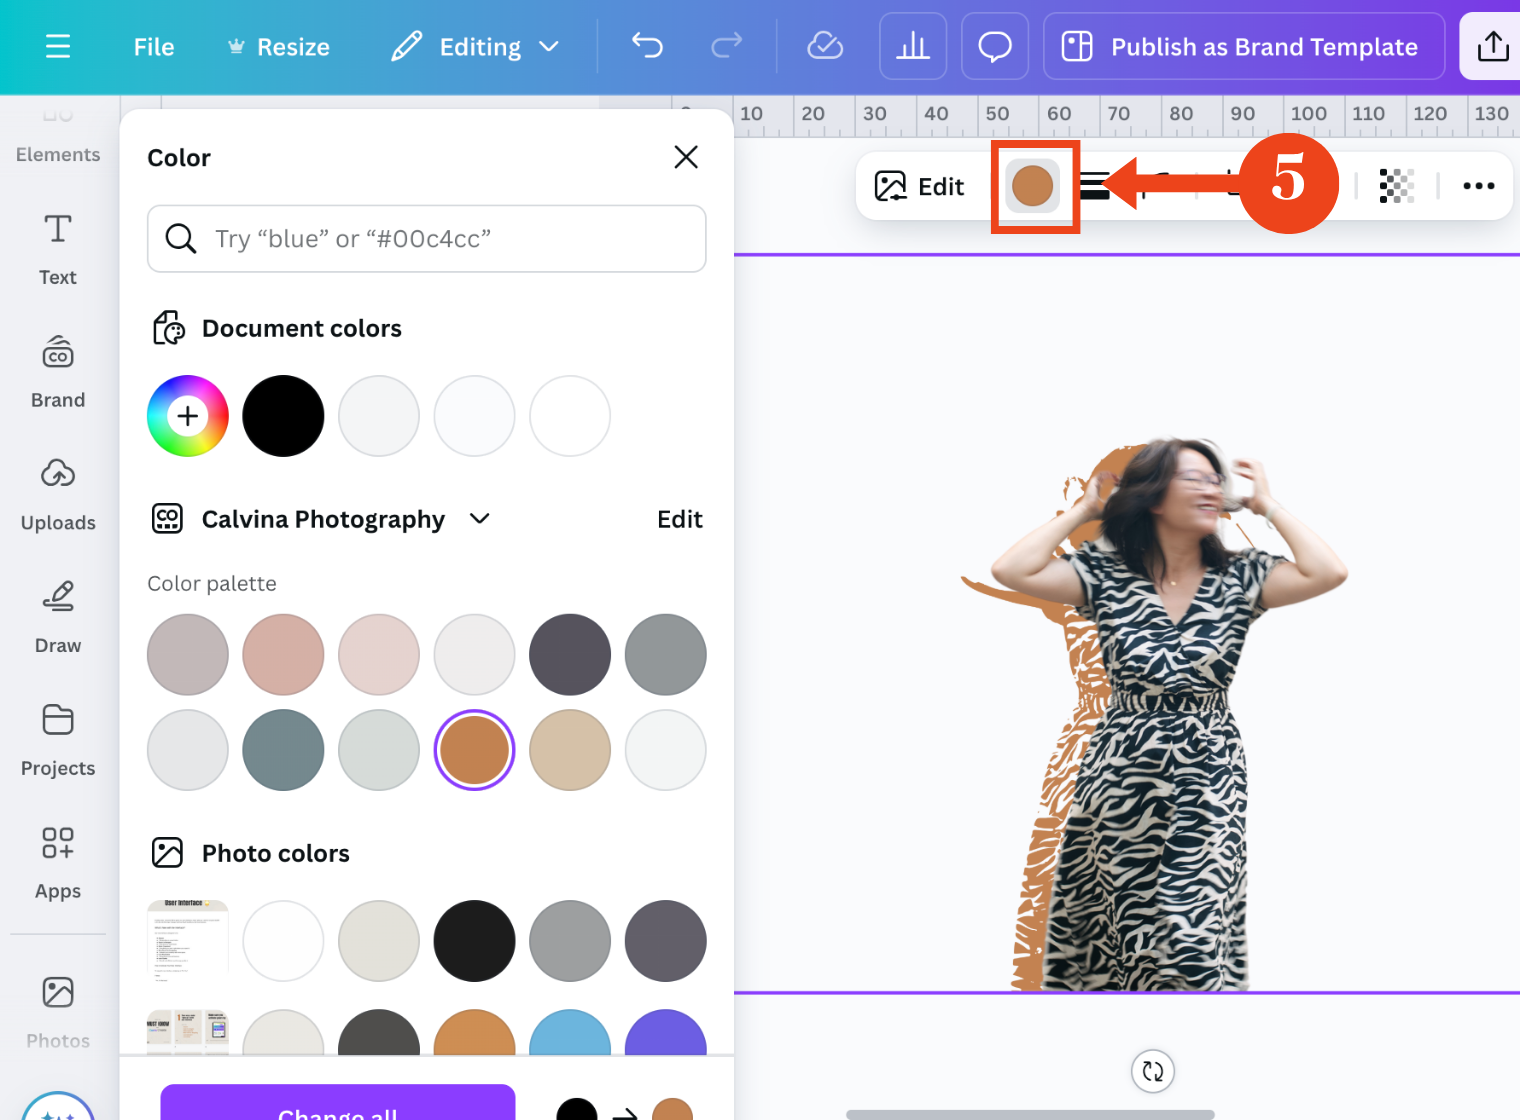
Step 5: Adjust the Trace Settings & Customize
Fine-Tune the Trace: Once the tracing process is complete, you can fine-tune the results using the “Threshold” slider. Adjusting the threshold allows you to control the level of detail in the traced image. Move the slider to the left to lighten the trace or to the right to darken it. Once, you’re done, click ” Add to design“.
Change Colors: Once you’re satisfied with the traced image, you can easily change its color. Simply select the traced element and choose a new color from the color palette.
Creative Applications of the Tracer Tool
The Tracer tool opens up a world of creative possibilities. Here are some ideas to inspire you:
Logo Creation: Create unique and eye-catching logos by tracing hand-drawn sketches or existing logos. You can also create multiple logo formats for your brand.
Pattern Design: Trace simple shapes and combine them to create intricate patterns.
Character Design: Use the Tracer tool to create unique characters for illustrations or animations.
Product Mockups: Trace product images to create realistic mockups for your website or social media.
Infographics: Combine traced elements with text and other graphics to create engaging infographics.
Advanced Tips for Using the Tracer Tool
Image Quality: The quality of your source image will significantly impact the accuracy of the traced result. Use high-resolution images for the best results.
Background Removal: Ensure that your image has a clear background for optimal tracing results. If the background is complex, use Canva’s background removal tool to isolate the subject.
Experiment with Threshold: Play around with the threshold setting to achieve different levels of detail in your traced image.
Combine with Other Canva Features: Combine the Tracer tool with other Canva features like filters, effects, and text to create stunning designs.
Practice and Experiment: The more you practice using the Tracer tool, the better you’ll become at creating unique and creative designs.
Expanding Your Design Toolkit with Canva
Canva has plenty of features that pair well with the Tracer tool. Use these to build out your brand assets once you've got your vectors sorted:
Templates: Use pre-designed templates to get a head start on your designs.
Graphics and Icons: Access a large library of graphics and icons to add visual elements to your designs.
Stock Photos: Find high-quality stock photos to complement your designs.
Video Editing: Create polished videos using Canva's video editing tools.
Text effects: Once your vectors are in place, dress up your headings with color gradients. Our Canva TypeGradient tutorial walks you through it step by step.
The Tracer app is one piece of a bigger workflow. When you combine clean vectors with the right type treatments and templates, your designs hold up across every brand asset, from a small icon to a full print layout. For more ways to get the most out of the platform, our Canva design tutorials cover the tools we lean on with clients. If you're building out custom branded elements, the same approach carries over to our Canva brand template tips so you stay consistent without depending on a designer.
By mastering the Tracer tool, you can unlock your creativity and elevate your designs to new heights. Experiment, explore, and let your imagination run wild!
Frequently asked questions
Can I convert a PNG to a vector in Canva?
Yes. Upload your PNG, remove the background if needed, then run it through the Tracer (Vectorify) app or the built-in Vectorizer. Both give you an editable vector you can resize and recolor.
Does Canva have a free vectorizer?
Canva has a built-in Vectorizer feature. Access to it depends on your plan, so check what's available in your account. For more control over detailed images, the Tracer app is your other option.
What is the difference between Canva Tracer and Vectorify?
Nothing, really. They're the same tool listed under two names. Search for whichever one shows up in your app search and use it the same way.
Can I export Canva designs as SVG?
Yes, if you're on a paid Canva plan. Once you've traced and cleaned up your graphic, download it as an SVG so it stays crisp across your brand assets, from a small icon to a large print piece.
Pro Tip: If you want to save hours of time and avoid getting lost in thousands of templates, colors, and fonts, Brand Magic with Canva will teach you how to think like a designer and help you build a solid foundation for using Canva and thinking like a designer.